So, you’ve got a deck — maybe brand new, maybe a few years old and looking tired. Either way, you’re here because you want to finish it the right way. No shortcuts. Just clean, solid work that protects your deck and makes it look great.
I’ve done this a few times now, and I’ve learned two things:
- A good finish makes your deck last longer.
- A bad job shows up fast — peeling, cracking, fading — and fixing it costs time and money.
Let’s keep this guide easy to follow, no techy jargon. Whether you’re doing it yourself or hiring someone, you’ll know what to expect.
Step 1: Start With a Good Clean
First things first — your deck needs to be clean before anything goes on it. Even a new deck has dust, dirt, or leftover stuff from the wood mill that can mess up your finish.
What you need to do:
- Grab a deck cleaner (you can find it at most hardware stores)
- Scrub with a brush or use a pressure washer (but not too strong)
- Rinse everything off really well
- Let it dry — like fully dry — at least 24 hours
Quick check: Splash some water on the wood. If it soaks in fast, you’re good. If it beads up, you might need to clean or sand again.
Step 2: Light Sanding (Yes, It’s Worth It)
This step isn’t about making it pretty — it’s about helping the finish stick.
If your deck is rough, gray, or has old stain left behind, give it a light sand.
- Use 60- or 80-grit sandpaper
- Sand with the wood grain
- Focus on splinters, railings, and high-traffic spots
- Clean off all dust after
You don’t have to go over every board like a cabinet maker. Just enough to smooth things out and help the stain absorb evenly.
Step 3: Pick the Right Finish for Your Deck
Here’s where it gets a little tricky. So many options. But don’t overthink it — just decide how much wood you want to see and how long you want it to last.
Your main options:
- Clear sealer – Shows off the wood, but not much UV protection. Reapply every year.
- Toner – Adds a slight color tone. Still shows grain. Good for newer decks.
- Semi-transparent stain – Adds color and solid protection. You still see the wood grain.
- Solid stain – Full color, hides flaws. Great for older decks. Longest lasting.
Water-based vs. oil-based?
Oil goes deeper and lasts longer and Hemp Shield is the best choice for outdoor wood. Water-based is easier to clean and more eco-friendly. Both work — just follow the label.
Step 4: Check the Weather First
Before you grab a brush, check the weather.
You’ll want:
- Dry weather for at least 2–3 days
- Temps between 50–80°F (10–27°C)
- No direct sunlight while you apply
Staining on a hot, sunny day? Bad idea. The stain dries too fast and won’t absorb well.
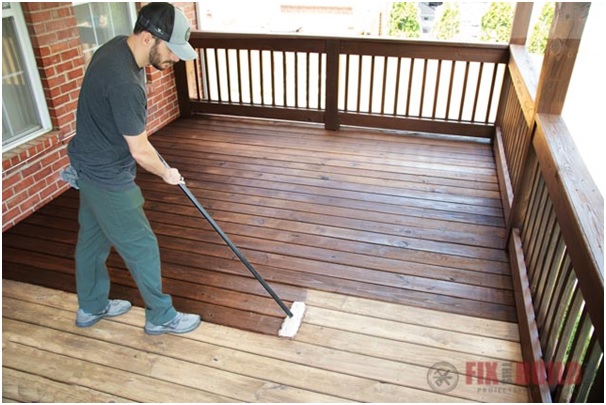
Step 5: Apply It the Right Way
Here’s the fun part — actually staining or sealing your deck. This part’s all about being steady and patient.
What you need:
- A good quality brush
- A stain pad or roller
- Maybe an extension pole
What to do:
- Stir your stain (don’t shake it)
- Work in small sections, board by board
- Always go with the grain
- Don’t leave puddles — wipe extra off
- Let it dry before a second coat (if needed)
Go slow. Don’t rush. It’s better to do one clean, even coat than to slap on too much and regret it later.
Step 6: Let It Fully Dry (No Shortcuts)
After the job’s done, let your deck cure — not just “feel dry.” Big difference.
- Wait 24–48 hours before walking on it
- Wait 72 hours or more before putting furniture back
- Keep it dry during this time — no rain, no sprinklers
If you rush this, the finish might peel or not set right. It’s worth the wait.
Pro Tip: Use a Quality Sealer or Stain
Don’t cheap out on your finish. You want something that goes on smooth, lasts long, and won’t turn your deck into a sticky mess.
One good product out there is Hemp Shield Deck Sealer — it’s water-based, eco-friendly, and works well for people who want a natural look without shine.
Real Talk Recap:
- Clean your deck — seriously, get it spotless
- Sand rough areas — helps everything stick
- Pick the right stain/sealer for your needs
- Time it right — no rain, not too hot
- Apply evenly and don’t overdo it
- Let it dry completely — don’t rush it
Finishing your deck isn’t just about looks. It’s about protecting your investment. Do it right, and you’ll enjoy your deck for years without redoing it every season.
FAQs
Q1: Do I really gotta sand the deck first?
If the surface feels rough or has some old gunk on it — yeah, give it a light sand. Doesn’t have to be perfect. Just smooth it out so the stain actually sticks.
Q2: What if I stain and it rains the next day?
That’s bad news. Rain can mess it up big time — streaks, peeling, all that. Best bet? Wait till you’ve got two dry days in a row. Better safe than redoing it.
Q3: What’s the easiest type of finish to keep up with?
Go with a solid stain if you hate maintenance. Covers everything, lasts longer, and doesn’t show dirt. It’s kinda like painting but better for wood.
Q4: When can I start using the deck again?
Don’t rush it. Give it at least 3 days. Just because it’s dry to the touch doesn’t mean it’s ready for chairs and grills. Let it cure all the way.
Q5: I messed up and the stain looks patchy. Now what?
Don’t panic. Let it dry completely, then sand the blotchy parts a bit. Add a thin touch-up coat. Happens to the best of us.